Puff Stitch Storage Baskets

I love making crochet items for the home, and I also love a puff stitch! Ever since making the zig-zag puff stitch cowl I’ve been looking for something else to use the stitch on.

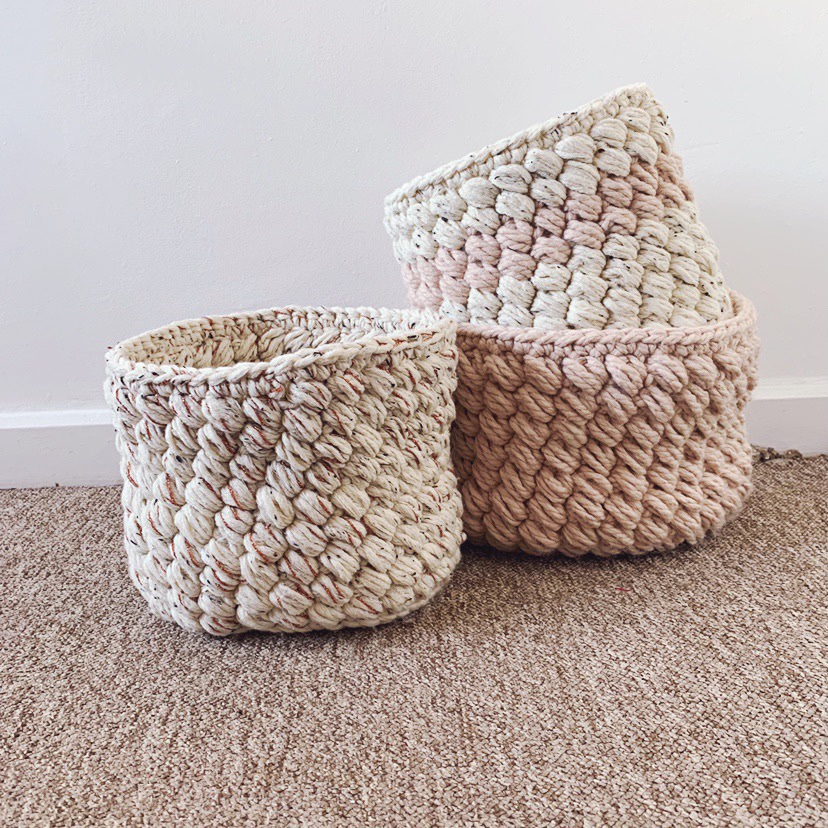
I’m also on a bit of a frugal kick at the moment focusing on re-using and recycling rather than buying brand new so when I was in need of storage boxes for a shelving unit in our bedroom I decided to whip up some myself using only yarn I already had in my stash.

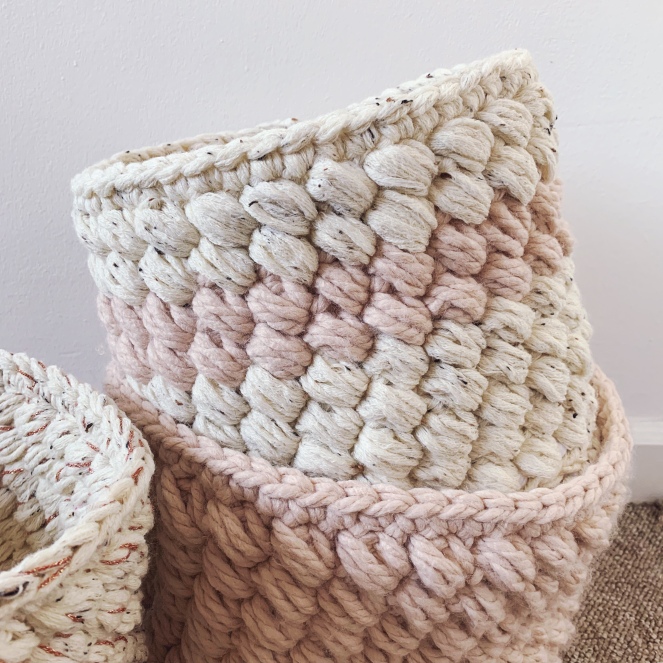
I opted to keep the colours quite neutral to match our bedroom. The top basket is made with Hobby Crafts Hug it Out yarn in colour way Shell. I had approx 2 balls left over which turned out to be the perfect amount. The cream yarn is an unknown yarn that was gifted to me, I think it’s King Cole but it is a chunky weight yarn in cream with brown speckles. I’ve also mixed into one of the baskets a copper sparkly yarn by Rico called Creative Lame.

I had to double up the chunky weight cream yarn to make it stiff enough to work with so the sides of the basket stood up firm with no sagging. No one wants a saggy storage basket! If you’re using Hug it Out that yarn is so super chunky you can use just one strand and it makes the perfectly sturdy basket.

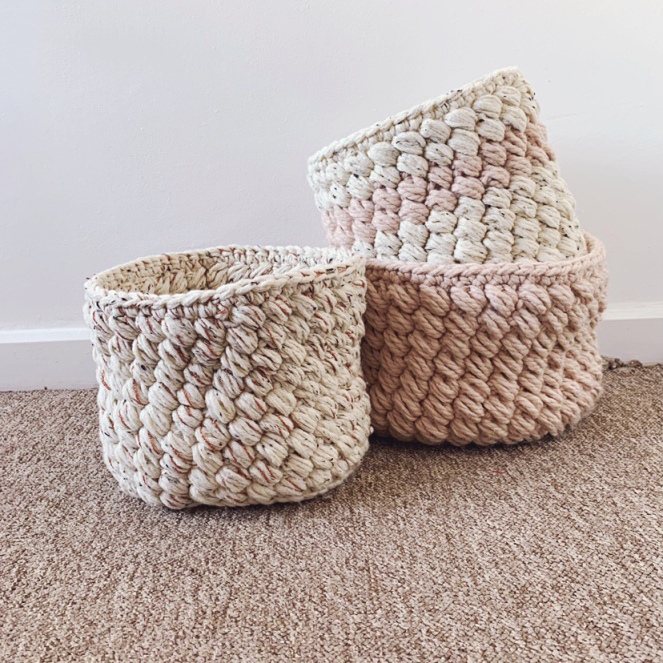
As you can see I’ve really mixed and matched different weight and textured yarns and the baskets have still turned out great so this is a great stash buster of a project.

I opted to use a slightly smaller hook than would normally be recommended for the thickness of the yarn but I wanted the stitches to be tight without giving my hands a hard time to absolutely make sure the baskets would stand up sturdy.

I’ve popped a rough pattern below for you if you want to whip them up yourself. I say rough as sizing and stitch counts will obviously vary depending on what size baskets you want and the yarn you use but I’ve given you the basics so you can get going and fill your home with handmade baskets!

Tools:

Crochet hook (I used a 12mm)

Chunky or super chunky Yarn

Tapestry Needle

Abbreviations (UK terms):

St – stitch

Ch – chain

Dc – double crochet

Tr – treble crochet

Ss – slip stitch

Fpdc – front post double crochet

Puff – puff stitch

Method:

We are going to start with the base which will be worked in joined rounds and should create a circle. The pictures shown in this pattern are using a different (smaller) yarn and hook just to make it easier to show you.

Start with a magic circle

Dc 6 into the magic circle, join with a ss to your first st

Ch2 (this doesn’t count as your first st), 2dc in the same st and each around, ss to join (12)

Ch2, 2dc in the same st, *dc in next st, 2dc in the following one* repeat between * till the end of the round, ss to join (18)

Ch2, 2dc in the same st *dc the next 2 st’s, 2dc* repeat between * till the end of the round, ss to join (24)

Ch2, 2dc in the same st *dc in the next 3 st’s, 2dc* repeat between * till the end of the round, ss to join (30)

Continue adding rounds working a dc into 1 stitch more than the round previous before you increase with 2dc each time until your base is the size you want you basket to be.

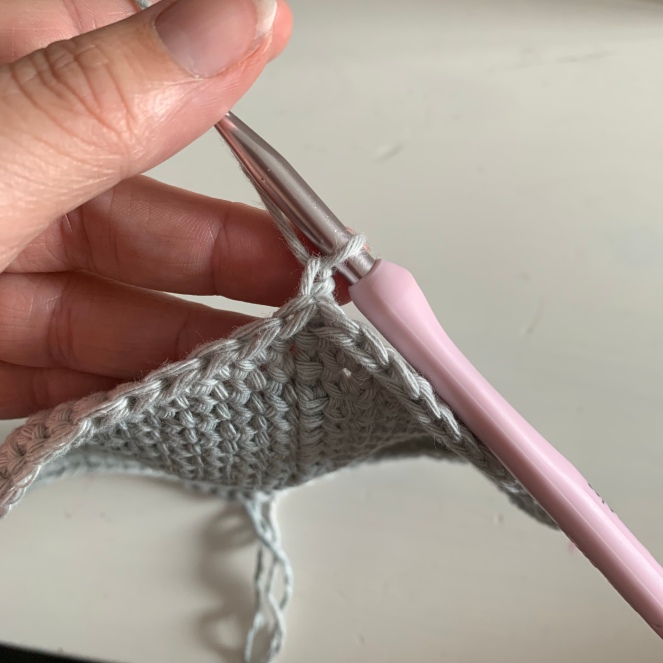
Do not ss your last row, instead leave it like this and remove your hook

You then want to insert your hook from BEHIND into the first st of your round (the one you would have ss into if closing the round) and then pop the yarn loop over the hook as well (see pic below for what you should end up with).

Now complete a ss by yarning over and pulling through the loop on your hook and the st. Your work should look like this when done…

We are now going to start working up the sides by working around the posts of the stitches rather than in the tops like normal. so ch1 to start

You will now work a fpdc around the first st. See the below photo for where you are inserting your hook. Insert your hook under the post, yarn over and work a dc as normal

After doing the first fpdc you will insert your hook into the same hole your hook came out of before on the previous st in order to create the next fpdc. This is what a few will look like once you’ve got started.

Continue till the end and ss as normal to complete the row.

Now we will work the zig zag puffs. Start by chaining 2 which will not count as a st in each row.

Skip a st, tr in the next st, now insert your hook in the st you skipped and work a puff stitch.

*skip 1st, tr, insert hook in skipped st and work a puff* repeat this until the end of the row. Ss to the top of the 1st puff to join.

Ch2, again skip 1 st and then work a tr in the next, insert hook in the skipped st and work a puff. You will be working your puffs on this row just the left of the previous row. Repeat this till the end and ss to the top of the first puff to join.

Repeat the above until your basket is the right height. Once you’re happy we can do the final row.

Ch2, dc in each st around and ss to the first dc to join.

And you’re done! Basket complete. Weave in all your ends and start using that beautiful crochet basket.

Halloween Bat and Pumpkin Patterns

Its that time of year again, my favourite time of year again… Halloween!
Leaves have changed colour and are falling off the trees, conkers have been collected and the coffee shops are finally getting their winter drinks in.

Sadly this year we have decided to take a bit of a back seat on Halloween as the tiny humans medical diet means we cant go trick or treating or have sweets and chocolates around but that isnt stopping us from transforming the inside of the house into the Halloween equivelent of a grotto. Every decoration we have will be creating a spooky atmosphere inside and with that in mind I decided to whip up a quick and easy Halloween garland.

It started with a bat, the pattern for this is simple but effective, I wanted to capture the proper bat outline with the spikey wings and little ears.

ACS_0116

And then for need of some colour came the pumpkin

ACS_E0113.JPG

I’ve popped the pattern for both below so you can choose to make a garland of all bats, all pumpkins or a mix of the two. You could be really snazzy about it and make them clip on so you can change it up depending on how you feel.

THE PATTERN

Yarn – I used black, orange, white and brown yarn in DK weight from my stash
Hook – 3.5mm
Lastly the pattern is written in UK terms.

ADK_0054

The Bat –
We are working in rows, turning at the end of each row and ch1 at the beginning of each new row.

WING (Make 2)
Ch6,
dc in the 2nd from the hook and each st across (5)
inc, dc4 (6)
dc5, inc (7)
inc, dc5, inc (9)
inc, dc7 (9)
ss, dc7, inc (10)
dc8, inc (10)
inc, dc9 (11)
dc10, inc (12)
ss, dc11 (12)
ss, dc10 (11)
ss, dc8 (9)
ss, dc7 (8)
inc, dc6 (8)
ss, dc6, inc (8)
inc, dc6 (8)
ss, dc6 (6)
ss, dc5 (5)
ss, dc4 (4)
ss, dc3 (3)
ss, dc1 (1)
dc1
You now need to sc around the edges of the wing, I worked 9dc to the first spike, ch1, dc4 into the valley, dc4 to the next spike, ch1, dc3 into the valley, dc4 to the end, ch1, dc3 across the end, ch1, dc24 across the top of the wing and back to where you started, ss to join and fasten off weaving in your ends.

BODY
ch6,
inc in the 2nd ch from the hook, dc3, dc3 in the last st, now working down the other side of the starting ch, dc3, sc in last st, ss to first sc to join.
dc inc, htr inc, tr3, htr inc, (tr, ch2, tr in the next st), htr inc, tr3, htr inc, dc inc, ss to first sc to join.
We are going to create the head now so Work 5 foundation dc’s and join back onto the body with a ss
ch1, turn, 2dc in each st of the head (10)
turn, ss4, ch2, ss in same sp, ss next 2, ch2, ss in the same space, ss next 4 and join at the end – this will have just created the ears.

You now need to sew both wings to the body. Use the pictures as a guide on where to join them. You can also use a little white thread to stitch some eyes.

ADK_0053

The Pumpkins –
We are working in joined rounds for these so each round should finish with a ss to the first st of that round and each new round will begin with a dc which we will not count as our first st.

IN ORANGE YARN
dc8 into a magic circle
inc around (16)
dc, inc, repeat around to the end (24)
dc, dc, inc, repeat around to end (32)
dc, dc, dc, inc, repeat around to end (40)
ss2, dc3, htr3, tr6, htr3, dc3, ss2, dc3,htr3, tr6, htr3, dc3, ss to join.

IN BROWN YARN
ch 6
htr in 2nd from the hook, dc 4
fasten off and leave a long enough tail of yarn to use to join the stalk to the body of the pumpkin

IN BLACK YARN
Stitch a pumpkin face onto the pumpkin, use the pictures as a guide or create your own expression.

ADK_0055

Lastly using black yarn (or any colour of your choosing) chain as many as you need to make a string the length you want/need to attach your pumpkins and bats onto.
I sewed the pumpkins directly on but added a hanging loop to the bats so you could still see their little pointy ears when hanging.
Also I choose to PVA block my bat and pumpkins so they were firmer and held their shape. I did this by pinning them flat onto a foam block, but a cardboard box or polystyrene will work as well, and then I used a mix of PVA and a little water to wash over the top of the shapes. I allowed it to dry overnight (its touch dry in an hour or so but really hardens overnight) and I gave it very liberal coating. Once dry they were nice and firm and stayed in shape while hanging.

Happy Halloween Witches!

The Wildflower Top

Crochet and kids are the perfect combination when it comes to inspiration. I’m constantly thinking of new ideas for something I would like to make for the tiny human in the house and it keeps the creative juices flowing.

It was exactly the same when it came to making the Wildflower Top. I had ordered some fabric fat quarters and one of them was a beautiful pink ditsy floral pattern which was crying out to be made into something cute.
The tiny human has recently started ballet and I pulled on that for inspiration on the design which is where the ruffles came from.

35518935_721536474683324_4172083561492381696_n

I’d originally planned to just add the peter pan collar with the fabric but as any of you with a 5 year old will know that they are big fans of hidding things in pockets! And so I figured if I was designing a top for her it would need to have a pocket.

Photo 18-06-2018, 8 17 40 am

The top as well as being super cute needed to be practical, the little madam is a fan of running around and getting up to mischief and so the top needed to be comfy and allow her to be free and move. This led to the oversized nature of the top with the loose fitting capped sleeves and the longer body.
If I’m completely honest I also wanted something that would fit her for more than 2 seconds as that is especially important when its something you’ve taken the time to make.

35643401_721536524683319_7137011971114663936_n

The top has gone down a storm and looks beautiful on as well as keeping the little miss happy. It works up super quick and has minimal sewing which is a double win in my books. Its whipped up with Paintbox yarn which is the softest acrylic I’ve found and comes in the softest shade of pink, which was exactly what I was after.

I’ve listed the pattern for all 4 sizes on both LoveCrochet and Etsy now so that you can make it for any little wildflower in your life.

35922834_724370587733246_5753470617001132032_n

As always dont forget to tag me in your makes on social media as I love to see what you have done.

B x

A Creative’s Nightmare

I think it’s happened to most of us at some point or another and it always crops up at the least convenient of times.

Writers call it writers block, artists; creative block but us crocheters, well we call it ‘loosing our crojo’ our crochet mojo of you will. Much to my dismay this is exactly what hit me recently. Everything I tried failed, I couldn’t think of anything new and exciting and even the usual works in progress were boring me. I just wasn’t getting any enjoyment for all the projects I attempted.

Therefore I set about finding a good pallet cleansing project that would hopefully kick start my inspiration and passion again. Now I wouldn’t call this a pallet cleanser as it ended up being neither quick or easy which are generally key points however it did make me determined to finish and helped me push through the block.

Enter stage left the latest cardigan for the tiny human.

All I can see are things I would like to change and tweak, which is common when I’ve created my own pattern. Thankfully the little lady was a big fan and put it on straight away.

I’ve used a beautiful yarn by Wendy called Fleur in the colourway Allium. It’s a DK weight yarn that is a mix of cotton, acrylic and Tencel giving it a super soft slightly fluffy brushed texture.

It took a little over 1 ball for the whole cardigan and I’ve used a mixture of stitches including the star stitch to create lots of texture.

I got carried away with lots of little details on this one and it just never quite seemed to be finished, but this does mean we have a lovely ribbed edging, and a crab stitches collar.

I’ve written the pattern up for this sizing along with measurements for adjusting as you need and it will be available for free on the blog next week!

A Winter Wedding

It’s not very often these days that I get to pick up the scalpel and craft a design from paper so it’s always a real pleasure when I’m asked to make one for somebody.

The process starts with an idea, a theme or event that needs to be incorporated and then I get to have fun sketching and drawing a design before transferring it over to my computer to digitalise and add text. This design was to be a wedding gift and so it needed to incorporate the date, location and the bride and groom.

The wedding in question was a rather special one being held in Iceland at a beautiful church in the middle of nowhere.

Surrounded by hills of snow and beautiful landscapes. I knew I wanted to capture that so I opted for a black paper so the background could be white and look like the snowy background around the church.

I’ve also made sure all the important details like their names and the date are featured as well as two important locations.

There are some tiny details on the churches including their super mini crosses and windows.

I’m a big fan of mixing negative and positive cutting so most of the cut has been cut away leaving the design behind as an outline except for at the bottom where I have cut the names away leaving the paper in place.

And of course no wedding cut would be complete without a white sparkly glitter background. It conjures up images of snow and looks exactly like a snowy roof on the church to the right.

It was such a pleasure to cut this piece and even the horror of trying to frame it without any dust sneaking in didn’t stop me enjoying the process. I’m super pleased to see it looking beautiful at home with the new happy couple.

A Ballerina Blanket

The last of my corner to corner blanket designs is complete (does happy dance).
I’ve had this one sat on my computer for months as I designed it along with the Christmas Robin last year but didnt get around to bringing it to life.

This month however the tiny human has began ballet classes which aside from meaning I have to be up at an almost ungodly hour on a Saturday, she loves, which made it the perfect timing to make a start on this blanket.

IMG_7615.JPG

I added the slight personalisation originally as I had decided to keep hold of this finished make for my daughter as she often tries to pinch them before they leave for their forever homes but I love the look of the letter in the corner so I’ve made the pattern available with a chart for each letter of the alphabet.

IMG_7611.JPG

I tried out a few border options before settling on the shell you can see in the photos.
I love the vintage feel it adds to the blanket especially paired with the dusty pink yarn.

IMG_7612.JPG

As you can see in the photos the pattern makes a blanket that covers a small person nicely. Its not a full single bed size but measures approx 28″x38″ which wraps around my 5 year old perfectly.

The pattern is listed here and comes with the full 26 charts, corner to corner instuctions, photos and directions for adding the border, its a fully packed PDF.

I hope you enjoy making this one as much as me, and I look forward to see the different colourways used.

I’ve also listed the finished blanket here in a very limited amount so you can buy one made to order if you are not a crocheter, it is a very limited amount however as they do take a long time to make.

Miss B Signature

A different kind of journey

I’m going a little off topic for this blog post but I know lots of you have been curious and I’ve had so many messages of support and questions that I wanted to share a small part of our journey.

A lot of you already know that the tiny human of the house has epilepsy, she was diagnosed at around age 2 and we’ve spent the last 3 years between hospitals and consultants trying to get to a point where she is seizure free. Sadly we are not there yet which leads us to the latest part of our journey; at the weekend just gone we travelled back up to the hospital and had an EEG machine fitted onto Miss P’s head. All the little sensors were glued on securely and she has had to wear it day and night the whole weekend; with us back up on Monday for a slow and lengthy removal process.

The purpose of this EEG is to see whether Miss P is having seizures in her sleep that are waking her up. We had a special diary to fill in each time she woke up (I’m not sure how much sense it made in our sleep deprived state of the early hours!) and a button to press on the recorder to log the specific time she awoke.

All of this plus the continued brain wave recordings have been passed to the special doctor at the hospital who will decode and evaluate the results. In a few weeks time we should then know what the results show and if the Epilepsy is having any effect at night.

In addition to the above the tiny human will also be starting a diet called the Ketogenic diet. It’s extremely low carb and forces your body to get energy from fat reserves instead of from the energy created by eating carbs (fear not she has a lot of high fat foods to keep those reserves up as we are not trying to get her to loose weight).

Your brain processes energy from ketones differently and it is this change in process that us and the doctors are hoping will help reduce her seizure activity.

I may have said a very sad goodbye to the wonders that are bread and pasta but we are going to have as much fun as a person can spiralising all sorts of vegetables instead 😉

So there we have it, a small update on what’s been going on. I hope I’ve not completely bored you all and I promise the usually yarny goodness will return soon.

Spring Cushion Cover

A little while ago Hobbycraft asked me to design a spring make for them to feature on their blog. After doing a crazy lady happy dance I put my thinking cap on and thought of everything that reminds me of spring; Easter, baby chicks, lambs, bright flowers, blossom, pastel colours, the list was long.

In the end I hopped onto Hobbycraft and took a look at the yarn, to offer some additonal inspiration. I knew I wanted to use Aran weight yarn and at least one side would be corner to corner to add some texture.
As soon as I spotted the WI Home cotton yarn and all the pretty pastel colours I knew thats what I wanted to use. The colours reminded me of a spring bouquet and so I wanted to make something with flowers.

IMG_7038.JPG

The design evolved naturally and I got rebellious with the back panel picking colours at random for the stripes rather than keeping them in a uniformed format.

IMG_7040.JPG

I’m a huge fan of reversable pieces as I love how you can change the look of a room and freshen it up by just flipping the cushion/throw etc over.

This design is really simple and only a few basic stitches are needed. Hope over to Hobbycraft here for the free pattern if you fancy making the cushion yourself.

The WI home cotton yarn iteself is gorgeous, it creates beautifully neat textured stitches and is sturdy enough to make a quality feeling cushion cover without being too bulky and heavy. The colour options are all happy sunny shades that are perfect for any spring make you can put your hook to. I am already thinking up my next creation with it!

IMG_7036.JPGIMG_7037.JPG

If you do make the cushion please remember to tag me as I love to see your creations and variations.

Miss B Signature

The Magical Rainbow Unicorn

All the best things in one cosy blanket. That’s exactly what I was after when I decided to whip up another c2c blanket. A little dash of magic, a sprinkle of rainbows all topped off with a pinch of unicorn!

The colours really do the talking on this blanket and they work perfectly with the simplicity of the unicorn and the neutral white in the centre square.

I’ve used the absolutely gorgeous Paintbox Yarns to make this. The colours are so bold and it is by far the softest acrylic I’ve come across making it ideal for a baby blanket.

I’ve listed this finished blanket in my shop (just click the link in the menu up there 👆🏻) but as usual there is only one available.

The pattern is also listed if you wanted to give this beauty a go yourself. It would be such a fabulous baby shower gift! I bet no one else will be gifting something similar…

Now to finish the next design I’m working on…

The Pinafore Dress

Happy New Year! I realise I’m massively late saying this but as usual I’ve been a bit rubbish at keeping to my own set schedule and this post that was originally planned before Christmas also missed the first week of January waggon as well. But nonetheless I hope your 2018 has started fabulously and I’m excited to get sharing with you…

Now it’s obviously not the first time I’ve made something for Miss P but normally I have kept it simple and stuck to the usual winter hats and scarves. I did venture in to the odd cardi as you might remember from this post in the summer but until recently thats been it.

Something pushed me to try something more ambitious and after making this pastel dress I made recently I finally had the confidence to have a go at creating an item from scratch.

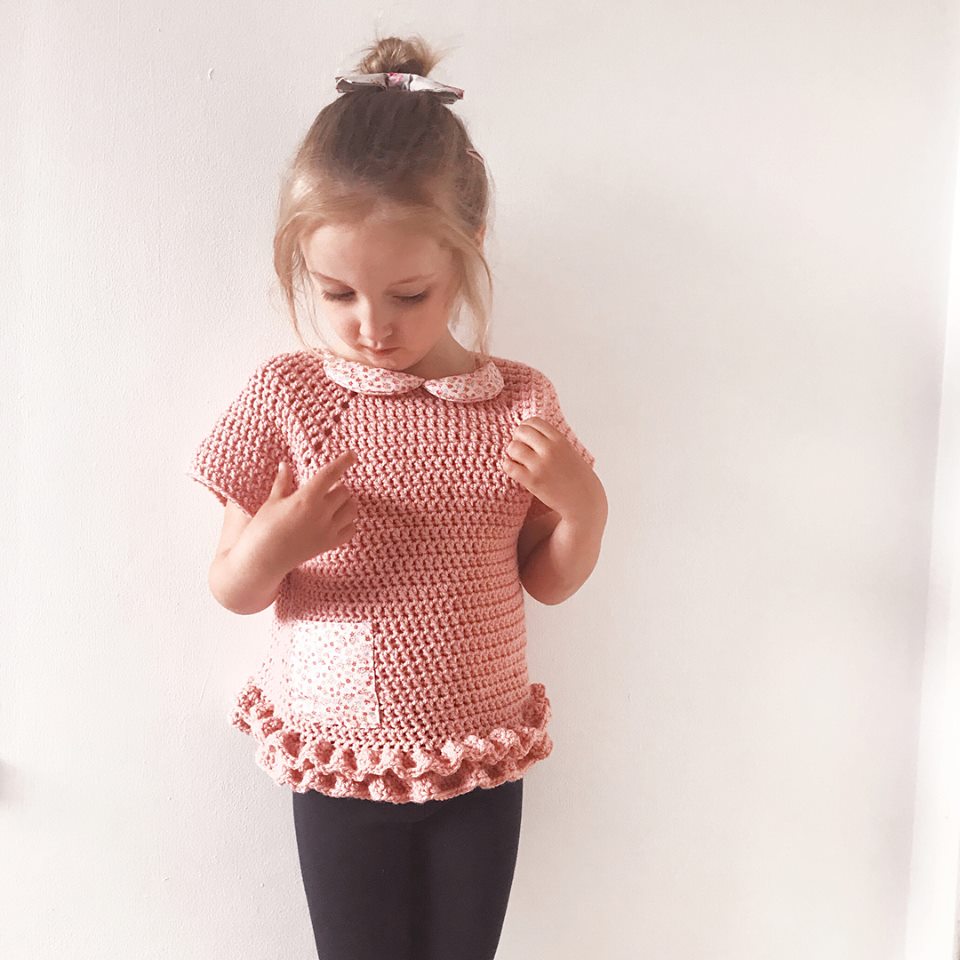
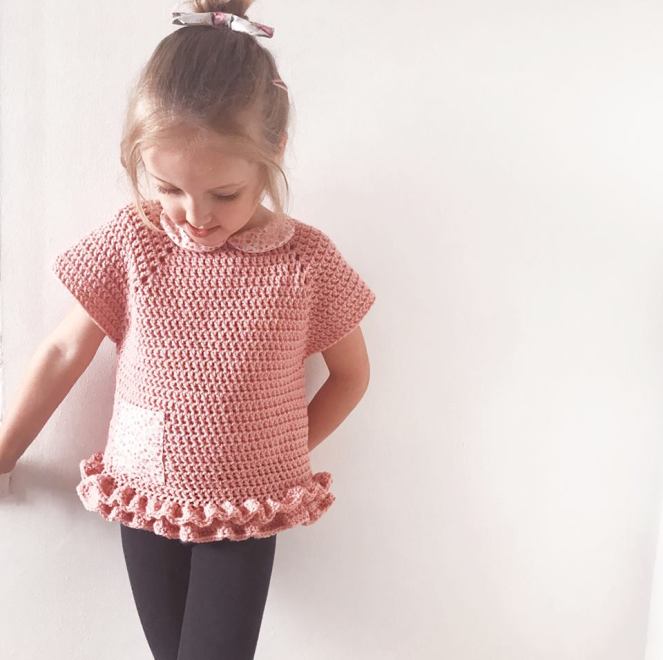
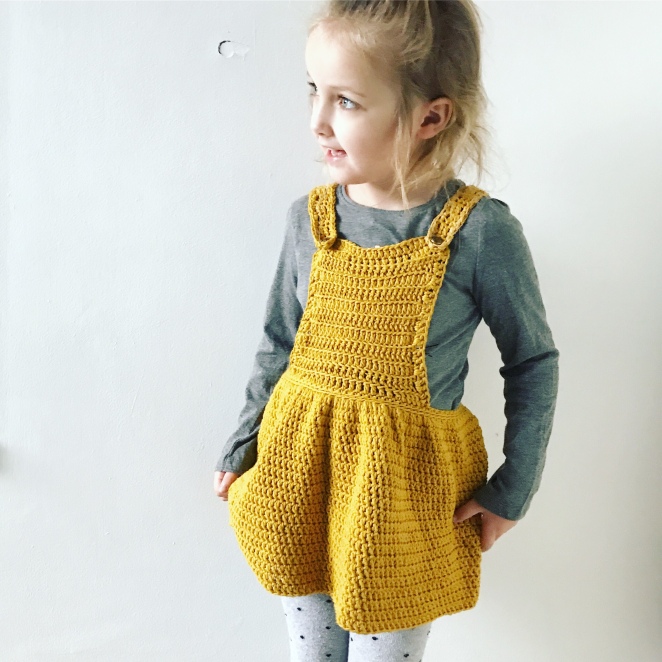
I instantly knew it needed to be a vintage stlye pinafore dress and I had been desperate to make something in a lovely mustard shade for months. Its a colour that just sums up Autumn to me and is bold without being too offensive. I used Drops Paris in Mustard and the weight of the yarn was perfect. Its not too heavy but as its cotton it has great stitch definition and stays cool when layered up.

I’ve created the skirt to have a slightly fuller ruffle and subtle ribbing on the waist band.

The back features cross over straps and are finished off with some small brass buttons I found in my stash.


I am so in love with this little dress and thankfully the little lady of the house seems to be equally as impressed. The only thing I cant decide on is to pocket or not to pocket? I’ve dithered over adding one to the top chest piece or two smaller ones on the skirt or leaving it as it is… I just cant decide. Help!

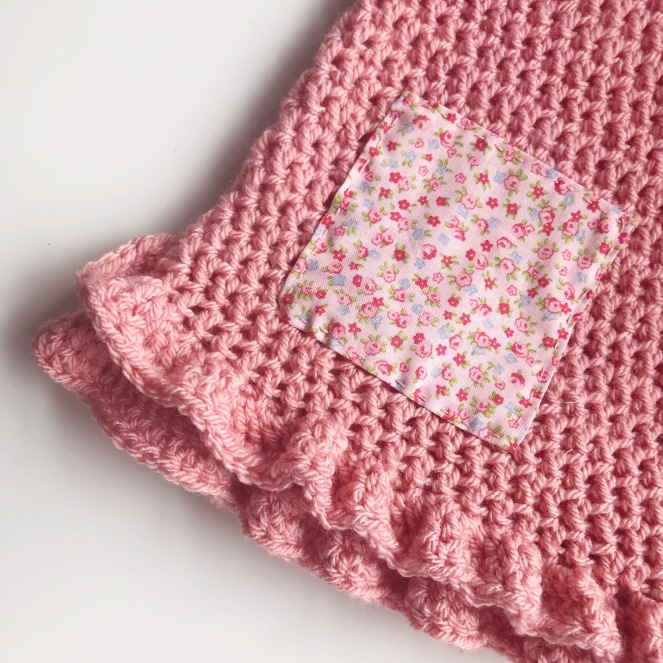
I have written the pattern up for this size so once I’ve manged to adjust it for other sizings I will pop it up on my shop

Miss B Signature